How to Do a Hanging Indent in Google Docs: A Step by Step Guide
In today's digital age efficient document formatting is essential for
clear and organized content presentation. Google Docs a popular word processing
tool offers various formatting options to enhance the readability of your
documents. One such formatting feature is the hanging indent. Whether you're
writing an academic paper creating a bibliography or simply looking to improve
the overall aesthetics of your document mastering the hanging indent in Google
Docs is a valuable skill.
How to Do a Hanging Indent in Google Docs
Understanding the Hanging Indent
Before we dive into the
steps to create a hanging indent in Google Docs let's clarify what a hanging
indent is. A hanging indent is a typographical style where the first line of a
paragraph starts at the left margin while the subsequent lines are indented to
the right. This formatting style is commonly used for references citations and
bibliographies giving your document a polished and professional look.
Benefits of Using Hanging Indents
Using hanging indents
offers several advantages:
1.
Enhanced Readability: The
hanging indent format helps readers quickly identify where a new entry or
reference begins.
2.
Neat Appearance: It gives
your document a tidy and organized appearance making it visually appealing.
3.
Academic and Professional Use:Hanging
indents are standard in academic papers research projects and reference lists
ensuring your work meets the necessary formatting guidelines.
Step by Step Guide to Creating a Hanging Indent
Now let's get into the
nitty gritty of how to create a hanging indent in Google Docs.
Step 1: Open Your Document
Begin by opening the Google
Docs document you want to format with a hanging indent.
Step 2: Select the Text
Highlight the text you want
to format with a hanging indent. This could be a bibliography reference list or
any content you wish to format in this style.
Step 3: Access the Ruler
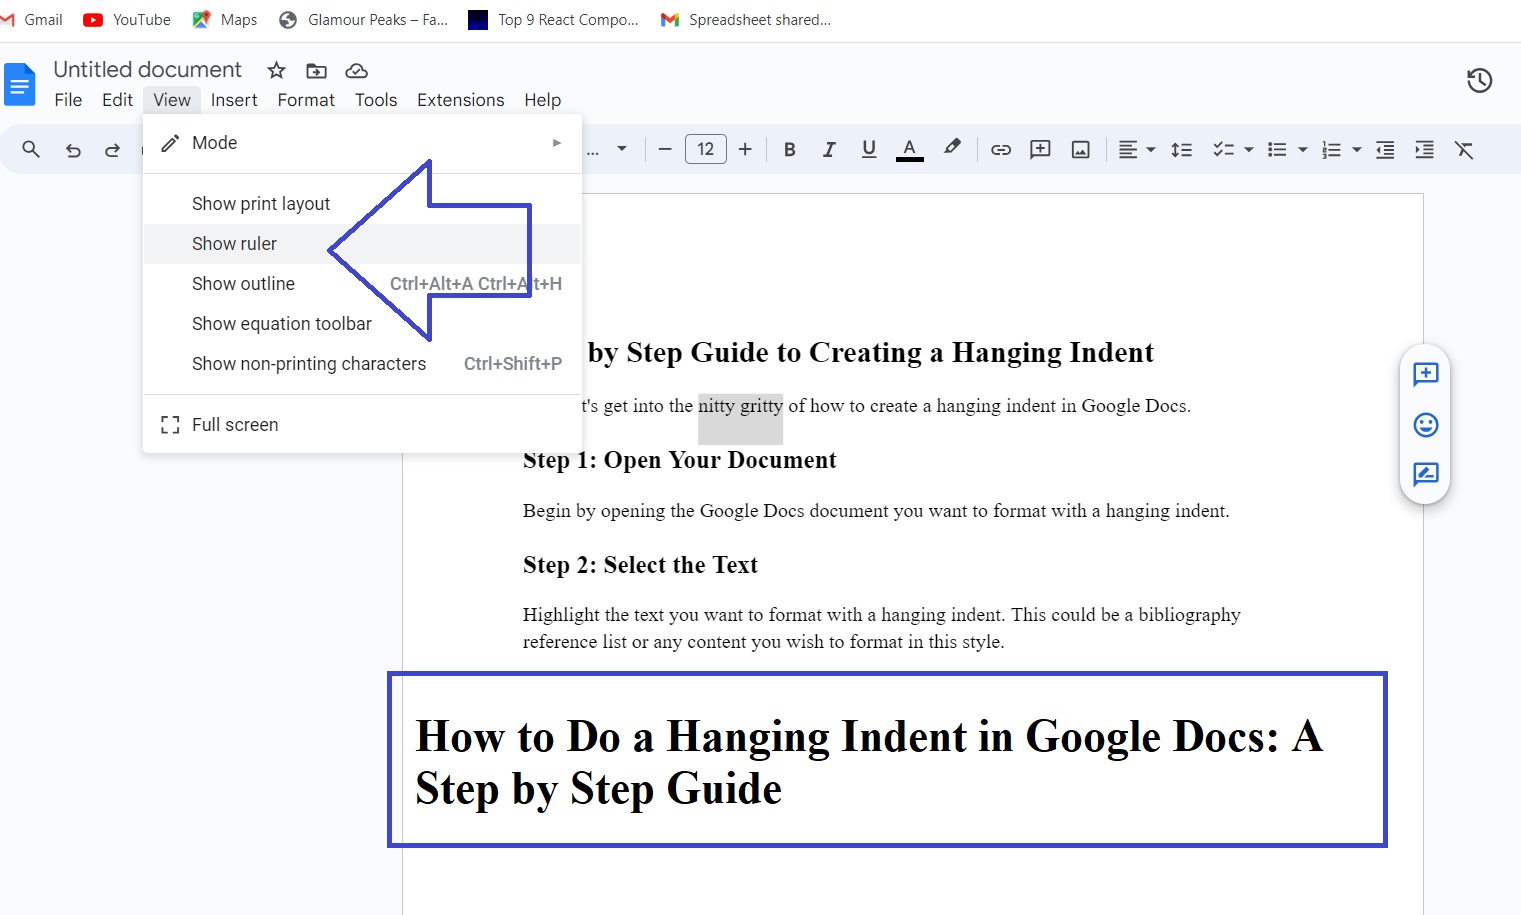
Go to the top of your
Google Docs window and locate the ruler. If you don't see the ruler you can
enable it by going to View and selecting Show Ruler.
Step 4: Set the First Line Indent
Place your cursor on the
blue rectangle at the left end of the ruler. This represents the First Line
Indent marker. Click and drag it to the right to the desired indent position
for the first line of your paragraph. Typically a 0.5 inch indent works well.
Step 5: Set the Hanging Indent
Now locate the light blue
rectangle the Left Indent marker on the ruler. Click and drag it to the same
position as the First Line Indent marker. This action ensures that the
subsequent lines are indented as well.
Step 6: Review Your Formatting
Take a moment to review
your text. You should see a clear hanging indent with the first line starting
at the left margin and subsequent lines indented. If adjustments are needed you
can simply click and drag the markers on the ruler.
Tips for Using Hanging Indents Effectively
·
Consistency: Ensure
uniformity in your hanging indents throughout your document for a polished
look.
·
Updating: If you
add or remove entries from your list remember to adjust the hanging indents accordingly.
· Keyboard Shortcut: You can also use the keyboard shortcut Ctrl+T Windows or Command+T Mac with the text selected to create a hanging indent.
Also read these related Articles: How to Delete Page in Google DocsHow to Change Margins in Google Docs
Conclusion
Mastering the art of
creating a hanging indent in Google Docs can greatly enhance the
professionalism and readability of your documents. This simple formatting
technique is especially valuable for academic research and reference materials.
With a bit of practice you'll find that hanging indents are a useful tool in
your document formatting arsenal.
Frequently Asked Questions
1. What is the purpose of a hanging indent?
A hanging indent is used to
format lists references and citations. It ensures that the first line of a
paragraph starts at the left margin while the subsequent lines are indented to
the right improving document readability and aesthetics.
2. Can I adjust the size of the hanging indent in Google Docs?
Yes you can. Simply click
and drag the First Line Indent and Left Indent markers on the ruler to adjust
the size of the hanging indent to your preference.
3. Is there a keyboard shortcut for creating a hanging indent in Google
Docs?
Yes you can use the
keyboard shortcut Ctrl+T Windows or Command+T Mac with the text selected to
create a hanging indent.
4. Where is the ruler located in Google Docs?
The ruler can be found at
the top of the Google Docs window. If it's not visible you can enable it by
going to View and selecting Show Ruler.
5. Are hanging indents commonly used in academic writing?
Yes
hanging indents are a standard formatting style in academic writing
particularly for references citations and bibliographies. They help ensure that
documents adhere to established style guidelines.


No comments
Note: Only a member of this blog may post a comment.