What is Feedburner ?: Learn how to take advantage of this tool
Did you know that with Feedburner you can manage your RSS Feed in a much more efficient way? This Google tool can help you collect more information about your subscribers and in this note, we will teach you how to use it.
When a user enters your website and subscribes to your RSS Feed, they will be able to receive a notification every time you have made an update to your content. Feedburner is an excellent tool that will help you optimize this process and create a strong community of followers.
In the following article, we will explain what Google Feedburner is about and what are the steps you have to follow to implement this service on your WordPress website. Don't miss out on this valuable information!
What is Feedburner?
In order to understand what Feedburner is, you must first know what Feed RSS is. This is a system that works as an XML file that contains all the data related to the content of the site: the description, the author, the attached links, the publication date, and the images.
In this sense, the RSS Feed serves to facilitate the management and publication of information on web pages. Using this system you will be able to know when a blog is updated and have access to the most recent news of the platform.
So what is Feedburner? In short, it is a Google tool that gives you the ability to offer, manage and quantify the total subscriptions to feeds that a specific website has.
By implementing Feedburner, RSS can be configured in a more personalized way. In addition, it also helps webmasters to place Google Adsense advertising, includes an email subscription system, enables the possibility of subscribing from different RSS readers, and also offers you a series of statistics to analyze the number of subscribers.
If you want to learn how to configure the RSS Feed with Feedburner for your WordPress website, we invite you to continue reading this note in which you will find all the steps you have to follow.
 Source: Pexels
What are the benefits of using Feedburner?
Now that you know how Feedburner works, below we will mention 5 benefits that, according to the Envato Tuts + portal, you can obtain by implementing this tool:
1. Analyze the subscribers to your feed
One of the advantages of using Feedburner is that you will be able to access important information about your subscribers and it will help you to know how they interact with your website. Best of all, this information can be exported in Excel or CSV format for further analysis. The statistics that you can access are:
- Subscriber growth to your feed (since Feedburner implementation).
- Information on how your audience subscribes to your website.
- Data about the types of browsers that subscribers use in your feed.
- Information about the content your subscribers view and what elements they click on.
- Data from the countries where your subscribers come from.
2. Offer email subscription option
By including Feedburner on your website, you will be able to offer your audience the option to subscribe to your website in an easier and faster way, using only their email. It also gives you different alternatives to customize the subscription form:
- You can implement the subscription form in different languages: English, Spanish, French, Chinese, etc.
- You can embed the subscription form directly to your website using HTML.
- You will be able to edit the title of the form, modify the colors and fonts.
- You can schedule the time for sending emails according to your preferences.
On the other hand, Feedburner gives you the option to download the list of your subscribers' emails in case you want to implement an alternative service such as MailChimp or Aweber.
3. Redirect your feed easily
In the event that you need to move your website to a different domain or change the subdomain, it can be difficult to migrate all your subscribers (unless you know how to redirect with .htaccess ). However, when using Feedburner you will only need to edit the feed details and save all the changes made.
4. Post to Twitter and Facebook without using a plugin
Another feature of Feedburner is that it allows you to connect directly with your Twitter and Facebook account so that you can share any update through those social networks. In addition, you can customize the message that will be sent, include hashtags, add images, etc.
5. Create an HTML list for your latest posts
So that no user misses your latest posts, with Feedburner, you can insert a list of your recent updates on any website where HTML can be used. In addition, you can also customize the display style that the list will have: the amount of information, title name, modify the content, etc.
 Source: Pexels
How to configure the RSS Feed with Feedburner in WordPress?
Now is the time to get down to business! After knowing the great advantages of using Feedburner on your website, it is time to learn how to implement it.
To configure Feedburner on your WordPress website, you just have to follow the following steps that the website, Shout me loud, indicates:
Step 1: Create an account on Feedburner
Go to the Google Feedburner page and log in with your Gmail account. Upon accessing, you will see that you will be asked to add the URL of your blog. In the case of a new WordPress blog, you can create a test post to do the Feedburner configuration.
Step 2: Add your website URL
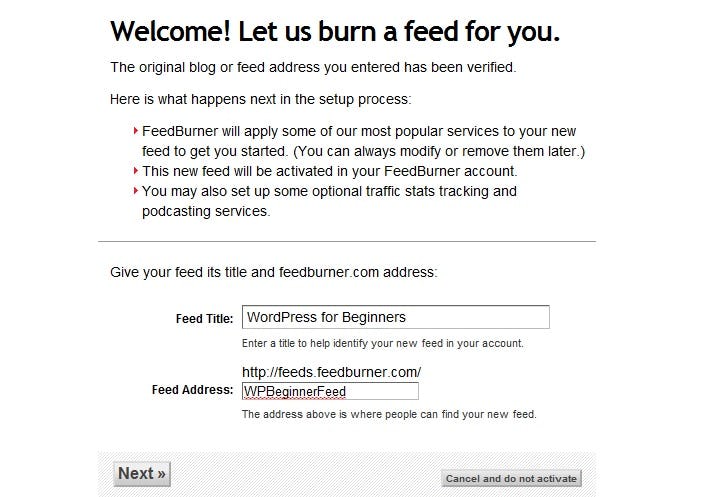
The next step to configure Feedburner is to copy the URL of your blog's feed, place it in the indicated box and click Next. For WordPress blogs, the default feed would be something like http://domain.com/feed, replacing the domain.com part with an actual domain name.
Step 3: Specify the name of the feed
To implement Feedburner it is necessary to specify the name that your feed will receive. We recommend that it be the same as your domain name, although if it is very long you can only include the initials. Another option is to use a keyword for the title of the feed, that will help you reach a wider audience.
Step 4: Install the Feedburner plugin
After performing the previous steps, you will see a message indicating that your feed is ready. The next thing we recommend you do is to install the Feedburner plugin for WordPress to get the most out of this tool.

Source: Ephesos Software
How to optimize your WordPress page with Feedburner?
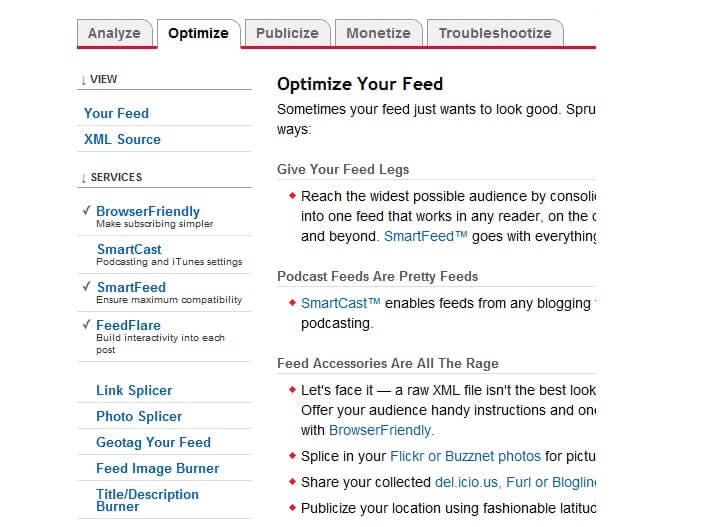
Now that you know how to configure the RSS Feed with Feedburner, the next step is to optimize your WordPress blog or website with this tool. To do so you have to follow the following steps:
Step 1: Enter the optimization tab of the feed manager.
Step 2: Verify that you have the following options enabled:
- BrowserFriendly: to make subscribing to the RSS Feed easier.
- SmartFeed - to ensure maximum compatibility with all feed reader applications.
- FeedFlare: it will allow you to create more activity in the publications of your website.
There are other Feedburner services that you can also implement, however, we consider these three functions to be essential if you want to get the most out of this tool.

Source: Ephesos Software
How to set up the email subscription feature in Feedburner?
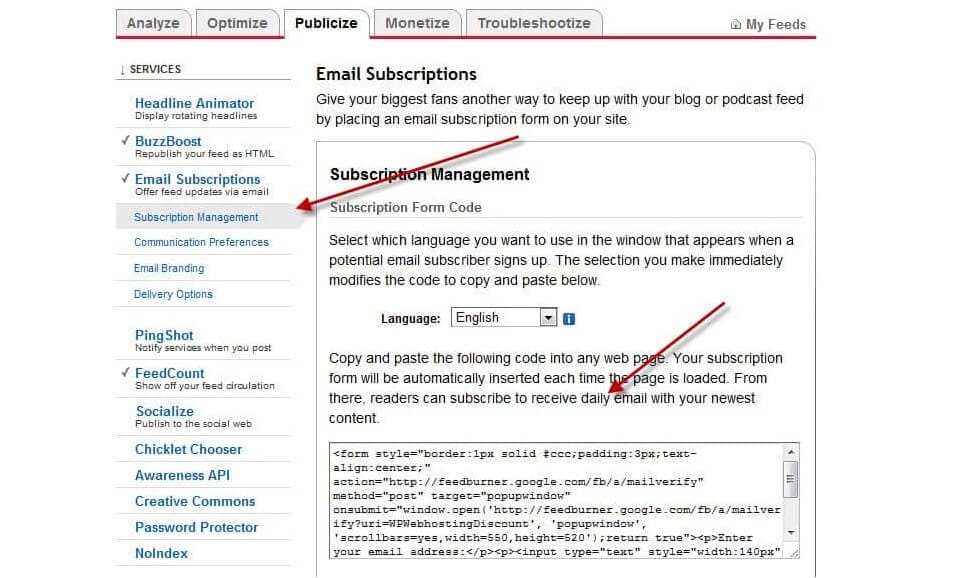
As we mentioned before, Feedburner offers you the option to enable subscriptions to your website in WordPress via email. To be able to activate this function, you only need to carry out the following sequence:
Step 1: Go to the tab that says Post.
Step 2: Click on the Email Subscription option found on the left sidebar.
Step 3: Activate the option to offer feed updates by email.
Step 4: Go to the Subscription Management option.
Step 5: Copy the code that appears on the screen and embed it in the text widget of your WordPress blog.
 Source: Shout me loud
Extra: Discover the most used WordPress plugins
Do you want your WordPress website to look amazing to give your users an excellent browsing experience? Then pay attention to the following plugins that will help you optimize your site.
Richard Medina, teacher of the online course Build your Website in WordPress, recommends including the following plugins on your website:
1. Duplicate Post
It helps you to duplicate pages, in case you want to use a similar structure for another note. This way you can preserve the features and details that you like to maintain greater uniformity on your WordPress website.
2. TinyMCE Advanced
This WordPress plugin allows you to improve the text editor with dozens of basic options that do not come by default. Some of the functions that this plugin includes are changing the font, modifying the background colors, underlining, and justifying the text, among many others.
3. Fuse Social Floating Sidebar
This plugin allows you to add to your WordPress page a floating bar in which you can display the icons of your social networks so that users can easily share your content. In addition, you will be able to customize the size and shape of the icons so that they do not break with the aesthetics of your page.
4. Responsive Slider - Image Slider
One of the best WordPress plugins you can incorporate! This tool allows you to add an image slider adapted to the design of your website. You will be able to upload multiple images without any problem and you will also provide a more elegant aesthetic to your page or blog that will help it look much more professional.
5. Ultimate Shortcode
Your WordPress website will be much easier to customize with this plugin, as it allows you to create tabs, buttons, boxes, sliders, image carousels, responsive videos, and much more. You can also access different templates and text widgets.
These are some of the most used WordPress plugins, but remember that you can explore the platform to find many other tools that can help you significantly improve your website.
 Source: Pixabay
We hope this note has helped you understand what Feedburner is and how it works. If you want to learn more about creating and managing web pages, here are some free WordPress courses that you can't miss.
Don't go yet! Before you have to visit our catalogs of online courses on Web development and technology, where you will have the opportunity to become an expert in the design and implementation of different digital platforms. See you on the next note!


No comments
Note: Only a member of this blog may post a comment.